Thursday 21 February 2013

Night Goblin WIP_12


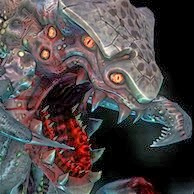
Baked maps and had time for a quick screeny of the low poly with maps applied in marmoset.

Maps on show are Diffuse colour (+AO and Cavity), Normal map and Translucency applied to the ears.  No spec colour, gloss or emissive yet.

There are some visible seams due to splitting the mesh into seperate objects because Marmoset doesn't (I think) support multi-sub objects.  Seams are pretty much invisible in Max.  When the model is finished I may look to get some shots out of Max using Xoliul's Viewport Shader.

I've split the Goblin into three texture sheets, although its really two sheets with an optional third.
Texture sheets are as follows:

  • Texture sheet one includes:  Face, eyes, teeth and tongue.  The face is what I want the viewer to really engage and considering I started the project with the intent of creating a shiny portfolio piece it made sense for me to dedicate a large amount of room for the face.
  • Texture sheet two includes:  Body, pants and necklace.  Once I've completed the robes, the goblin's body (plus pants and necklace) won't be seen.  The body is quite large so squeezing it amongst pieces that will always be visible seemed wrong to me.  Now I can give other objects more space and save resources by not loading the body texture when not needed.  Its definitely good to have the option especially if I decide to make a group of goblins later on, lots of variety! 
  • Texture sheet three includes:  Arms and legs. Unlike the body and unless I decide to make shoes, these parts will always be visible   If the final model didn't include a robe covering the body I'd have a single texture sheet for everything below the neck.


Monday 18 February 2013

Night Goblin WIP_11


A friend and talented character artist, Jamie-Lee Lloyd, suggested in my last post that my goblin may benefit from some subtle warm tones in fleshy areas.

I'll need to look at this tomorrow with fresh eyes but I definitely think it helps bring an extra layer of realism to the character.  I made sure to add these changes on a fresh polypaint layer so I can tweak it to my hearts content.

Up until now I'd been using reptiles as reference for the green/brown skin tones.  With the introduction of warmer tones I looked at tree frogs and geckos with particularly opaque skin.  I also looked at human face and body references.


Sunday 17 February 2013

Night Goblin WIP_08


Spending pretty much every minute of my spare time on this lil' dude.  Here you'll see some polypainting and continued outfit work.   I'm aiming to get a low poly version of him without his robes, hood and accessories complete before I continue with the rest of his outfit.  Everything in the first two images is ready to be baked down, except the pants which need some low mesh work.  I'm happy with the polypaint but I'm bound to touch it up and add extra detail in Photoshop.

I'll also be creating at least two other weapons (two daggers) and a shield. Ideally I'd like a range of weapons including spears and bows.  I've also got various head sculpts planned so I could make a small group of these guys. Alternate shield designs would also be nice but I'll have to see how it goes.. there's just so much to be done!

First and foremost, creating this warlord character is my priority. Variations after (hopefully.) ;)

...Now what would really be awesome is a giant squig for him to ride!.. ...I'm getting carried away again..

Friday 8 February 2013

Night Goblin WIP_06


From this point on I'll be labeling post titles to match image titles, just to avoid confusion.

Adding lots of details such as trinkets and small trophies.  Small animal bones work well as decorations and points to attach other objects to.  I'm leaving some of the larger props that'll attach to his satchel strap for last.  I'm thinking potions, mushrooms, trophies and weapons.

You can catch a glimpse of his sexy squig pants, the height of goblin fashion I'm sure.

Friday 1 February 2013

Night Goblin WIP_02


Before I and move on to sculpting the robes.etc,  I've decided to retopologise my existing subtools.  My current progress shown in the image (3dsMax screengrab, sorry for poor quality!)

Next I aim to unwrap the new meshes and project the existing high poly subtools on to them in Zbrush.

I usually skip projecting in Zbrush, favoring baking my maps in Xnormal using separate low and high poly obj's.  This has become the workflow I am most accustomed to so hopefully I'll learn a thing or two by doing things differently.  Exporting and playing with displacement maps may be a bonus too :)

Sticking to a low polycount (under 1k tris) has been the focus of a lot of my recent freelance work so it'll be nice change to aim high with this character.  For this project the final polycount isn't a major concern but I'm aiming for a solid portfolio piece, influenced by high end, current gen games.   Characters from 'The Witcher 2' have been a big influence, ranging at an average of about 14 - 25k tris.  35k for some of the more complex main character outfits.  I'll probably post my research in a later post.